


Week 7- Asset improvements, level design and tech art
- Sam Ayer
- Mar 11
- 5 min read

Updated: May 6
The first thing I did this week was post my scene on the University forum to gain some feedback on the project. My lecturer suggested that I should add some more divisions to the archway I had made in the previous week to increase the resolution. I reimported my model back into Maya, added these segments and recreated my high poly. I then applied the same texture in Unreal Engine.

My plan for my exterior was to use a single 2k trim sheet for the walls and a tiling material for the floor. I also planned to learn vertex painting to take the height data from my floor material and use it to add sand between the rocks.
My first step was to create the high poly of the trim sheet for the walls.
The material of the walls would be sandstone so I gained some references for the colours and shapes of sandstone before starting.


I would use a combination of the large slab for the lower part of the wall and the bricks for the higher part of the wall. This trim would work for all parts of my wall including the corner pieces and any other variants I may need.
I then baked this high poly onto my low poly wall, created a sandstone texture for it using my references, and rendered it in Unreal Engine.

I next created the tiling material which would be the rock floor for the exterior area. I created this in Substance Designer inspired by a tutorial I found on YouTube (Kalyson, 2020). I used this tutorial as a base and then used my sandstone references to help create a sandstone floor.

I then took it into Substance Painter to create the material and finally, baked it onto a plane.

Next, I needed to create the sand material which I could vertex paint between the gaps in the rocks in my floor tile material. This would make it look as if the sand was collecting between the rocks when I paint it on.
I created the sand material very simply on a plane in Substance Painter using a combination of Perlin Noise maps with varying height and colour.

Next I needed to learn how to set up vertex painting. Using the University's resources for research (mural.co, 2026c), I created a node based system in Unreal Engine. This allows the sand material to be painted onto the sandstone rock tile material using material layering from the lowest height to the highest height. This means that when it is painted on, the sand will only appear in the lowest height areas from its height map first, which would be between the sandstone rocks. If I add more sand with stronger intensity, the sand will cover the higher areas of the rocks as well.


The finished effect means I can have lumps of sand projected onto a plane, and smaller areas of sand between the rocks in certain areas. This is used to break up the tiling of my material and make it seem less repetitive.

I next copied this material layering for the inside tiles of the project so that I could create sand in the doorway of the interior of my scene as well.

Next in my scene, I used the same material I had used in my interior archways, on the large doorway in Substance Painter.

I wanted to keep experimenting with more technical features of my scene and began researching foliage using the university's resources (mural.co, 2026a). My plan was to create vines which I could have in various areas of my scene. I began by researching different types of desert plants and ivy and found an image on the internet which seemed a good fit (Vecteezy, 2019). I took this leaf into Substance Sampler and used it to gain all the texture maps which I would need.
I then created a branch in Tree It and created a simple wood texture for it. I baked the maps needed for this and created 4 photoshop files for 3 leaves (each with slightly different colour which I adjusted in photoshop) and the branch: a roughness, normal, opacity and base colour map. These would be the maps for the single material that would make up my whole vine.


I then applied these materials to planes in Maya and used MASH curve to align the leaves around the branch, and MASH random to apply random variation to the leaves. This could now be taken into Unreal and used in the foliage brush.


I next learnt how to make distance based culling so that any mesh which was blocking the camera would temporarily disappear.
I placed a cylinder between the camera and the character as a detector so that anything it touches would be affected by the culling.

I applied some nodes to the character that made the objects that touch the cylinder disappear, and then reappear when they are no longer touching it.
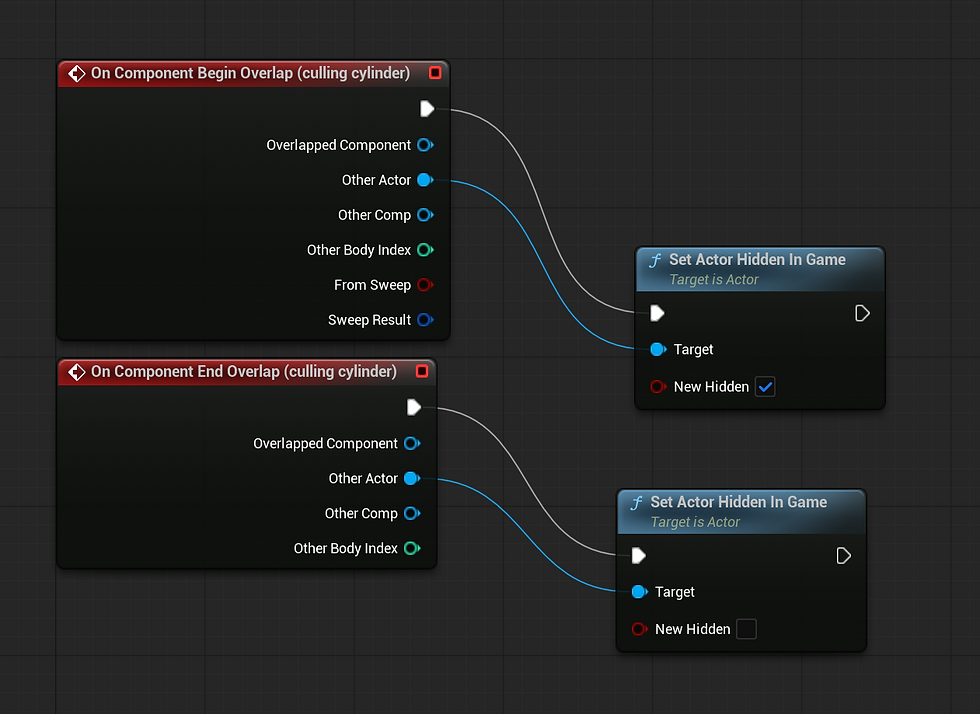
I then had to enable "Generate Overlap Events" for any mesh I wanted to be effected by this.


Next I created the torches which would be the main light source for the entire scene. I modelled a simple torch in Maya, created a rusting metal material and applied it in my Unreal scene.

I then researched the Niagara particle system which I would use to create the fire for my torches. I followed a YouTube tutorial (Tutorial: How to Create Fire in UE5, 2023) which taught me how to create 4 fire particles in photoshop as the base for my flames.

I then used these within a fountain system and removed the gravity so that the flames would go straight up. Then I altered the Niagara settings to distort the alphas and reduce them in size when they get higher until they disappear. I added a scale colour so the flames also become less orange as the flame goes up. Afterwards, I determined the shape of the entire fire so that the bottom would have more volume compared to the top.
Particle nodes and settings:


I added the fire to the torch and added a coloured point light to make the fire seem like it is glowing more.


I enabled distance field shadows which gives the shadows a smoother effect with no harsh edges.
Finally in my scene, I moved the interior walls closer together due to the amount of empty space which was being created by the large room.

To increase my composition, tone and colour knowledge I have been attending drawing for games sessions where I have created these pieces:


Bibliography:
Kalyson (2020). Substance Designer - Stone Floor Material. [online] YouTube. Available at: https://www.youtube.com/watch?v=SchTRegLhP0 [Accessed 10 Mar. 2026].
Tutorial: How to Create Fire in UE5. (2023). Tutorial: How to Create Fire in UE5. [online] Available at: https://www.youtube.com/watch?v=VZuBqScz-JY.
mural.co. (2026c). UE5 - Custom Blend Materials & Vertex Painting. [online] Available at: https://app.mural.co/t/gamesacademy5502/m/learningdesign2109/1657658908609/749ea47368b46a8770de65723ba057553dcbba7e.
mural.co. (2026a). Creating Vines in Tree It. [online] Available at: https://app.mural.co/t/gamesacademy5502/m/gamesacademy5502/1771335058383/45828bd88e7b6214aba1ed1a3fd01a3c8de6a5bb [Accessed 5 May 2026].
Vecteezy (2019). vecteezy. [online] Vecteezy. Available at: https://www.vecteezy.com/.


Comments